I. Introduction
A basement is a great space to make your own man cave or a place to hang out with friends, work, or relax. Before you can start designing your dream basement, you first need to consider framing. Framing your basement is the first step towards creating a comfortable and personalized space that meets your needs. This article is intended to provide a complete guide to framing a basement, both for beginner DIY enthusiasts and experts.
II. DIY Guide: 5 Simple Steps to Frame Your Basement Like a Pro
Framing a basement may seem like an overwhelming task, but with proper planning and execution, it can be an easy process that anyone can handle. Here is a guide to help you frame your basement like a professional.
Step 1: Measure the Basement Walls and Mark the Studs
Measuring the basement walls and marking the studs is essential for precise installation. Use a tape measure, level, and chalk line to create a stud layout plan for your basement walls. This will help you estimate the materials you need for the project and optimize the usage of your resources.
Step 2: Install the Sill Plate
The sill plate is the bottom part of the frame that sits on top of the concrete wall. It ensures the even distribution of the load to the concrete wall and prevents moisture from seeping in. Cut the pressure-treated lumber to fit the dimensions of your basement walls and lay it in position. Use a concrete anchor bolt to secure it to the wall.
Step 3: Install the Vertical Studs
After installing the sill plate, it’s time to install the vertical studs. Use a straight line or level to ensure the studs are vertical. Use a nail gun or screwdriver to fasten it to the sill plate and secure it at the top with a header plate and bottom with the base plate.
Step 4: Install the Headers and Blocking
The headers support the weight of the structure and make large openings like doorways and windows possible. Cut the header board to size, insulate the headers with foam spray, and then use two nails to attach the header to the vertical stud.
Step 5: Add Electrical and Plumbing Lines
Once the framing is done, add the electrical wires and plumbing lines according to your requirements before insulating the entire basement frame.
III. The Basics of Framing a Basement: What You Need to Know
Before you begin framing your basement, it is crucial to understand the basics of the framing process, the tools and materials you need, and the common techniques used in basement framing.
Overview of Framing Process:
The framing process is creating a skeleton that will form the structure of your basement. The process involves building a wall frame that meets the building codes, adding insulation materials, installing electrical outlets and HVAC systems, and closing the walls according to your preference.
Tools and Materials:
To get started with framing your basement, you’ll need the following tools and materials:
- Level
- Chalk line
- Measuring Tape
- Nail gun or Screws & Stick Nailers/ Hammer and Nails
- Sill plate
- Pressure-treated wood
- Insulation materials like foam spray
Common Techniques:
There are several common techniques for framing a basement depending on the frame material you choose. The most common techniques include:
- Stick Framing: Using wood to construct a frame. This is the traditional technique and is easy to construct.
- Metal Framing: Using steel to construct a frame. This is a more modern and durable option with quicker installation.
IV. The Pros and Cons of Different Basement Framing Techniques
There are upsides and downsides to each basement framing technique. Here we look into the advantages and disadvantages of stick framing and metal framing.
Stick Framing
Stick framing, also known as traditional framing, uses wood for constructing the frame. It is a straightforward technique that involves the use of 2×4 or 2×6 lumber for the frame.
Pros of Stick Framing:
- Easy to work on
- Better insulation because wood is a better insulator
Cons of Stick Framing:
- Takes longer to build
- Not as durable as metal framing
Metal Framing
Metal framing involves using steel for the construction of the frame. Typically, steel framing is lighter, stronger, and has a higher resistance to termites than wood.
Pros of Metal Framing:
- Quicker to build because the steel framing pieces are pre-cut and easily assembled
- Lighter in weight than wood and doesn’t require as many contractors to handle.
- Stronger and has higher durability, particularly when it comes to sound insulation
- Fits a wider range of designs and specifications
Cons of Metal Framing:
- More expensive than stick framing
- Not as good an insulator compared to wood
- Isolating the structure above and below becomes more complex
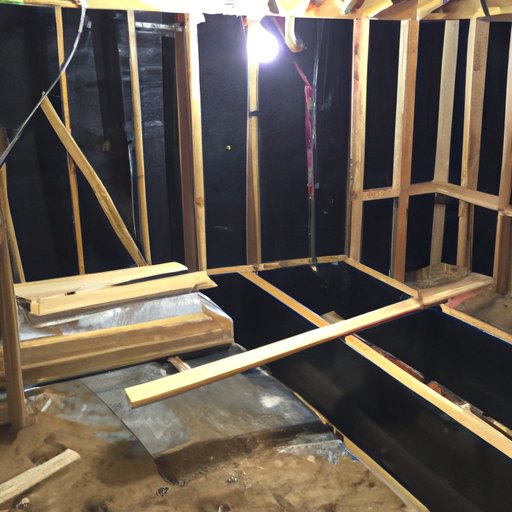
V. A Visual Guide to Framing a Basement
It’s often easier to understand the framing process when you can see pictures and diagrams to guide you.
Here are a few images that showcase the major steps of basement framing.
(Please insert the relevant diagrams and pictures to support the content of this topic)
VI. Insider Tips from Professional Contractors: How to Frame Your Basement Quickly and Efficiently
Framing your basement can be a time-consuming and labor-intensive project if you don’t have experience. Below are a few insider tips from professionals to make the process smoother and more efficient.
Incorporate Technology:
Leverage technology and digital tools such as online calculators for estimating the quantity of material you need. It’s faster and easier to enter the dimensions and get the precise calculations you need instead of attempting to compute everything by hand.
Use Laser Levels For More Accurate Lines:
A laser level will give you a more precise layout of your walls. You can quickly set up the laser level around your basement to get accurate vertical and horizontal lines.
Pre-Cut The Lumber:
Pre-cutting your lumber to the precise dimensions you need can make the framing process faster and more efficient. It also makes the pieces simpler to handle and makes the work area tidier.
VII. Going Green: An Eco-Friendly Guide to Basement Framing
If you want your basement framing to be environmentally-friendly, then consider using sustainable materials and application methods. Here are a few green options that are easy to incorporate:
Use Recycled Materials:
Using materials made from recycled products can help you frame your basement in an eco-friendly way. You can use steel studs, which are made entirely out of recycled steel, for framing or work with products made from recycled polystyrene or cellulose insulation for a greener option.
Consider Recycling Existing Materials:
Instead of building a frame from scratch, you can reuse items like old doors and windows, wooden pallets, and other materials to create a unique and sustainable space.
Insulate Adequately:
Harvesting energy consumed in a building is critical, so as to create a sustainable environment throughout the premise. Proper insulation helps maintain temperature thresholds inside the house and reduces energy usage. This can result in a significant reduction in your energy bills
VIII. What to Avoid: Common Mistakes That Could Sabotage Your Basement Framing Project
Framing your basement is a big investment of time and money. Avoid the following common mistakes that could sabotage your project.
Not consulting with city authorities:
Before framing your basement, make sure that you research the building codes for your local region and obtain any needed permits if necessary. You may face significant fines or have to pay more money later if you don’t follow the codes.
Failing to Insulate:
Failing to insulate your basement properly can lead to moisture damage, which will result in the growth of mold and mildew, and the basement is not as energy-efficient as it could be.
Not checking for water seepage:
Before commencing the framing process, you have to ensure that your basement is moisture-free. If you frame your basement over damp areas, the moisture will persist, leading to rot, warping, and mold growth.
IX. Conclusion
Transforming your basement into a useful living space is a huge step towards adding real value to your property. You can begin by framing it correctly from the beginning, ensuring that everything is structurally secure and that the project is time-efficient and cost-effective.
By following the guide above, you would have set yourself up for a successful project, you need to choose the best framing technique for you, select the right tools and materials, incorporate insider suggestions where possible, and consider eco-friendly options. So, go ahead, be creative and make your dream basement a reality.


